


Photo by Roman Synkevych on Unsplash
Git: Zero to Hero - Git Essentials
All you need to know to get started with Git and GitHub


Introduction
This article is intended for beginners to Git. By the end of this post, you will be able to work with Git projects and know the basics of Git internals. I hope by the end of this post you will get inspired to explore further in Git.
Any software project needs to be on a server so that it can be shared with others. Also, the history of your code changes will be helpful for future reference. A tool to do this and much more is the source control system (SCM). Git is the most popular and widely used source control system. Others are SVN, CVS, ClearCase, Perforce etc.
The original author of Git is Linus Torvalds. He is also the original author of Linux Kernel. He coded the initial version of Git in less than a month in April 2005. Intense desire for an open-source alternative to proprietary version control systems motivated him to create Git. So, we owe a lot to Linus 🙏.
Getting started
Let's explore Git and its features with a sample project. Download and install Git from here. We will create a sample project with a couple of text files. Here, files can be of any type, as Git doesn't care about the type of file. For simplicity, let's consider a few text files during the discussion.
Creating Git repository
Create a sample project git-zero-to-hero-sample
$ git init git-zero-to-hero-sample
Initialized empty Git repository in D:/practice/blog/git-zero-to-hero-sample/.git/
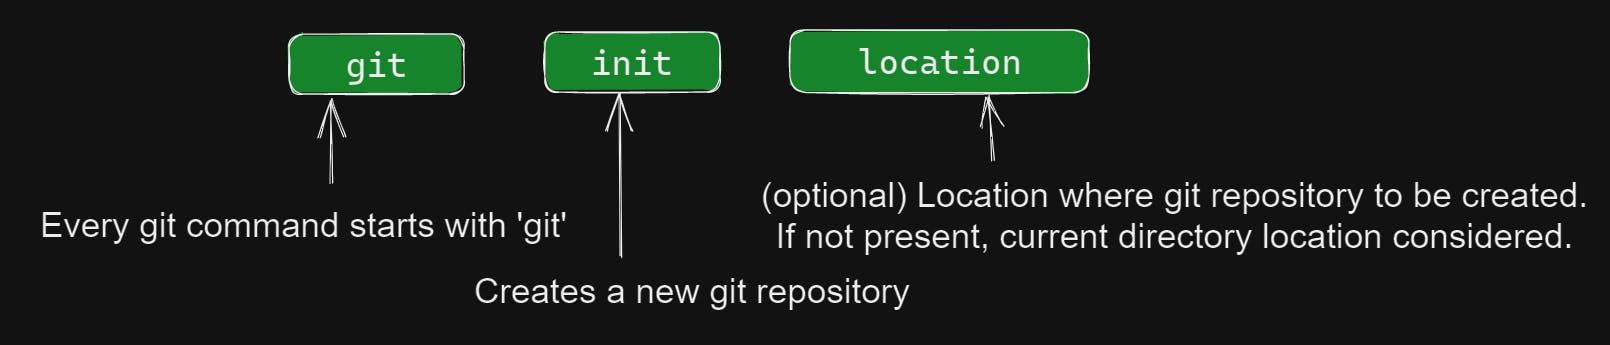
With git init we have created an empty Git repository. Although it contains .git directory which holds all git database, we hardly need to worry about it anytime.
$ cd git-zero-to-hero-sample/

$ ls -a
./  ../  .git/
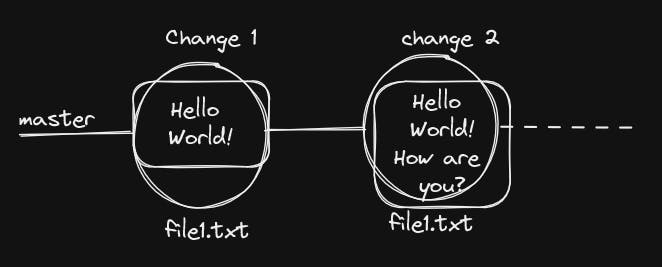
Any changes made inside git-zero-to-hero-sample can be part of Git repository. Also, notice master in the prompt. It is the default branch. Git branch is a pointer (don't worry, it's not a pointer in C programming language 😉) to a series of file changes in a repository. master is the default branch name. The need for a branch will be clearer once we make some file changes.
To know current status of Git repository, use git status:
$ git status
On branch master

No commits yet

nothing to commit (create/copy files and use "git add" to track)
It says we are on branch master and there are no commits. What is Git commit? 🤔
Creating a Git commit
Let's create file1.txt:
$ echo "Hello World!" >> file1.txt

$ ls
file1.txt

$ cat file1.txt
Hello World!
Just creating a file won't make it part of the Git repository. We need to explicitly tell Git to include a specific file as part of repository.
For this, we need to understand the typical flow of a file from modification to becoming part of the Git database.
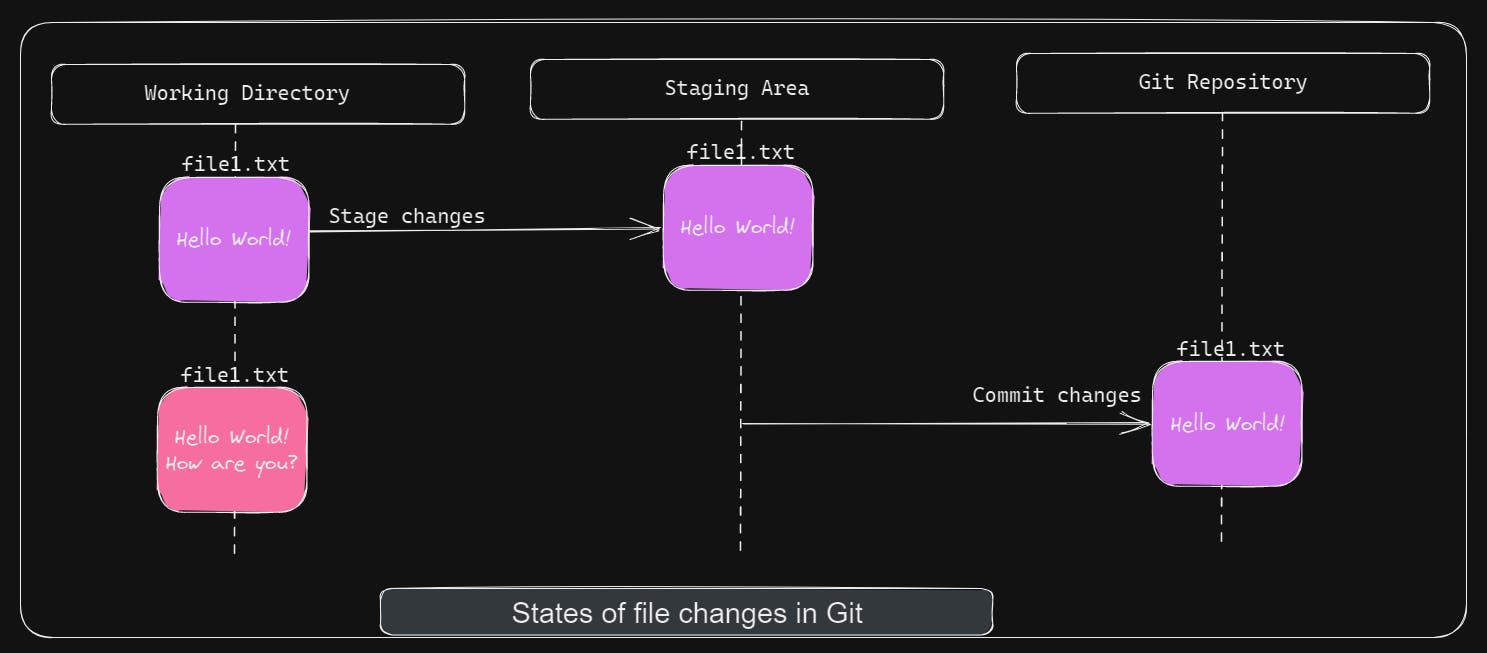
The Working Directory is where physical file changes reside. In the above case, it is git-zero-to-hero-sample directory. Now, once changes are made, we can mark selected files as ready for becoming part of Git repository. This is usually called staging the changes. Once changes are staged and if you think all changes are fine, then you can go ahead and commit changes. By committing, staged file changes become part of Git repository permanently. Git is a powerful tool where it is very hard to lose any information once it is committed to the repository.
You might be wondering what's the need of Staging Area, can't I directly commit the changes from the Working directory? 🤔 In above diagram, after the first set of changes are staged, another change was made in file1.txt. Since the latest change is not staged, it won't go into commit. This will give flexibility to do/undo changes, after staging the changes, without worrying about tampering with Git repository.
All this magic of Staging Area and Commit happens within .git directory. That's why it's a very important directory for Git to work properly.
Now back to file1.txt. We have made changes in the working directory. As you can see, with git status changes are not yet part of Git repository. git status is your friend when in doubt, it gives useful information for the possible next steps.
$ git status
On branch master

No commits yet

Untracked files:
  (use "git add <file>..." to include in what will be committed)
        file1.txt

nothing added to commit but untracked files present (use "git add" to track)
To stage the changes, use git add. We can add multiple files in git add, separated by space.
$ git add file1.txt
Now that changes are staged, they are ready for commit.
$ git status
On branch master

No commits yet

Changes to be committed:
  (use "git rm --cached <file>..." to unstage)
        new file:   file1.txt
To commit the change, use git commit
$ git commit -m "initial changes in file1.txt"
[master (root-commit) 8b68593] initial changes in file1.txt
 1 file changed, 1 insertion(+)
 create mode 100644 file1.txt
Here, -m a flag used for commit message indicating nature of changes being done.
Every commit has an associated unique commit ID. In this case, it is 8b68593. You need not worry about it now, but it will be useful in a few advanced use cases.
Creating a GitHub repository
Changes made so far are limited to your local system. The main goal of the version control system is to share and collaborate with the team. For this, we need a Git server to host our code. GitHub, Bitbucket, GitLab are the popular options. For discussion, we will consider GitHub from Microsoft. Go ahead and create a GitHub account.
We need to create a repository on GitHub to store our changes. For this select New repository option.

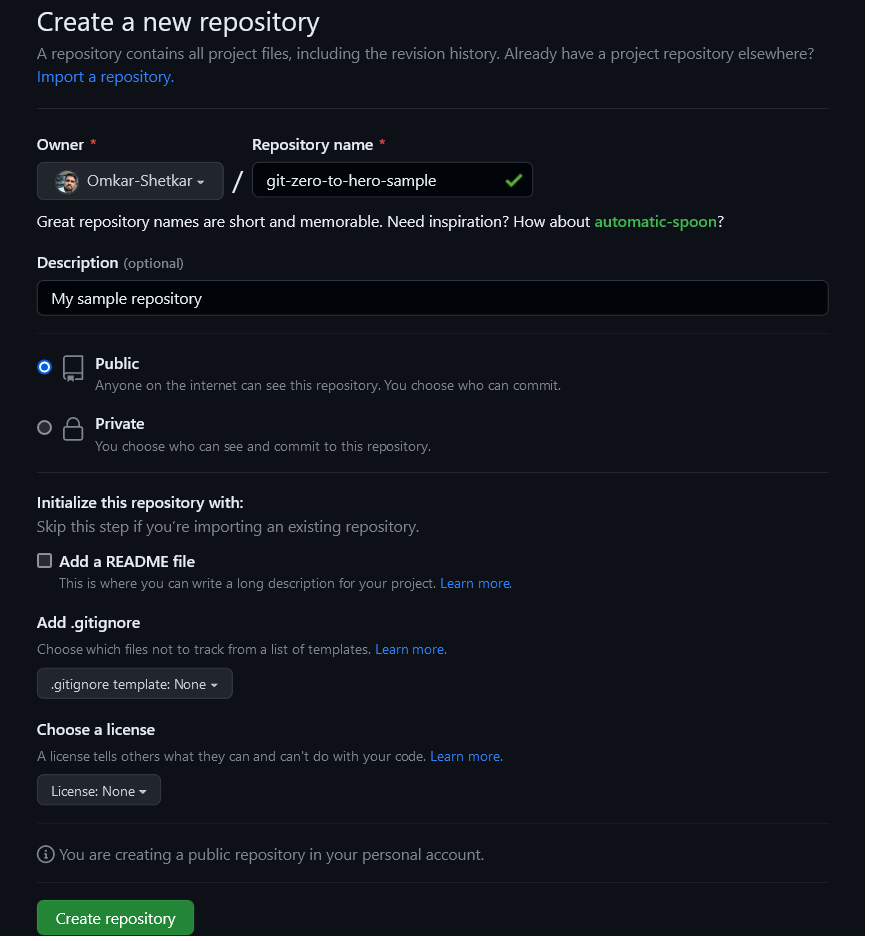
If a repository is Public its visible to others. If its Private its visible to a specific set of people. In both cases, we can moderate settings for read/write access. For now, keep the default options as they are.
After creating the repository, we will get the following screen:
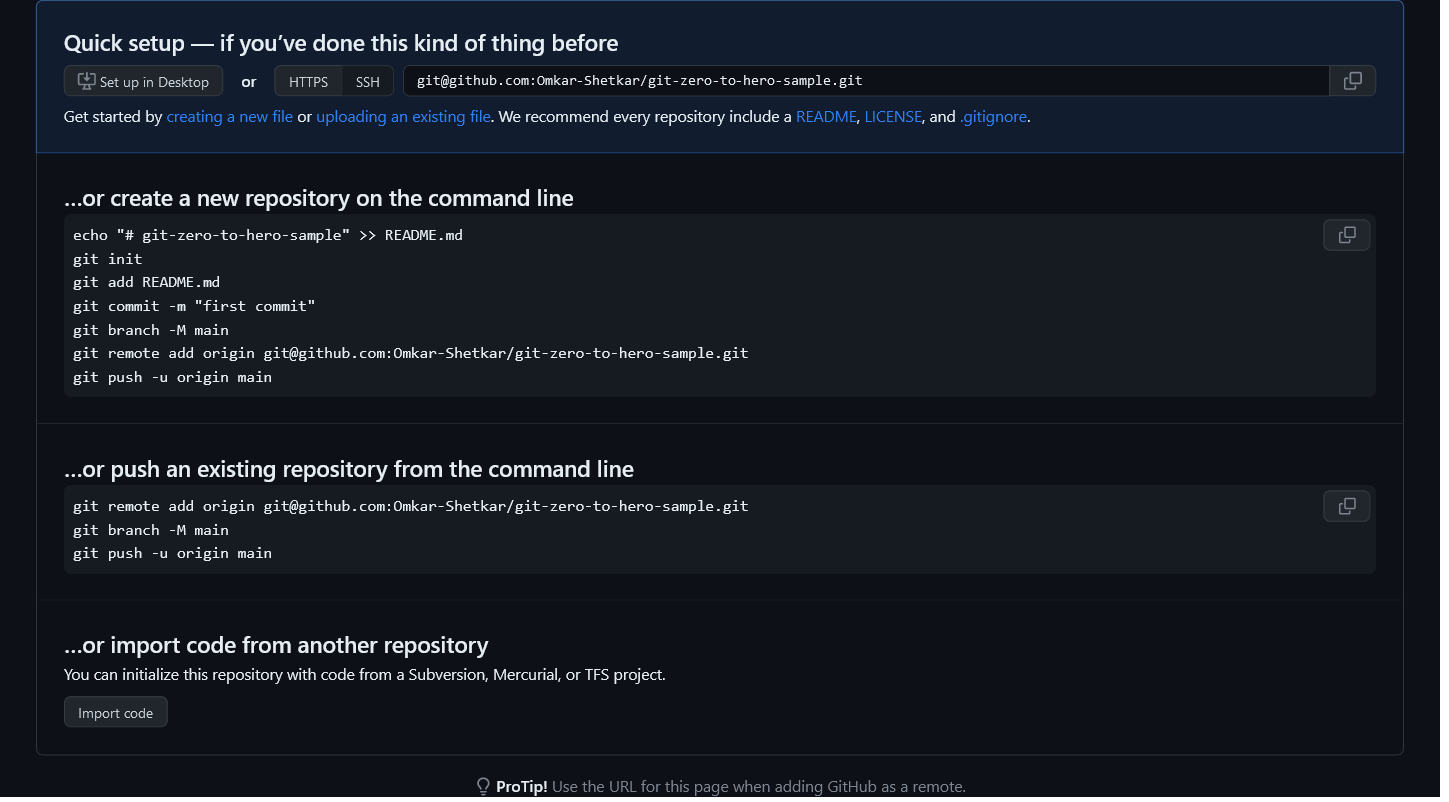
We have already created a repository locally. So, we will follow the second set of instructions.
$ git remote add origin git@github.com:Omkar-Shetkar/git-zero-to-hero-sample.git
git remote add will help our local repository to work in sync with remote GitHub repository.

This is not a requirement, but it is recommended to use the default branch name as main instead of master. The reason behind it is more of an ethical requirement than any technical requirement. We can verify your current branch name using git branch. Currently, we have only one branch master.
Let's rename master to main
$ git branch -M main
Now current branch will be main
$ git branch
* main
PRO TIP🚀
To avoid the hassle of renaming the branch from
mastertomain, you can create local Git repository with specific branch name. In this case, we want it to bemain. $ git init repository-location --initial-branch=main--initial-branchflag will ensure that Git repository will have specific default branch name.
Pushing changes to remote server
Finally, we will push our local changes to GitHub repository using git push
$ git push -u origin main
git@github.com: Permission denied (publickey).
fatal: Could not read from remote repository.

Please make sure you have the correct access rights
and the repository exists.
GitHub doesn't seem to recognize us as a valid user. That makes sense. Otherwise, anyone with the GitHub repository URL will be able to push changes to the server, which is not expected. But how to register myself as a valid user with GitHub?
Now, we need to take a little detour and discuss authentication with GitHub.
GitHub Authentication
GitHub has SSH and HTTPS based authentication for Git repository. We can choose either of them.
SSH
If we have added remote URL starting with git@, then we need to register our SSH public key with GitHub.

This can be done in GitHub at Settings --> SSH and GPG keys --> New SSH key.

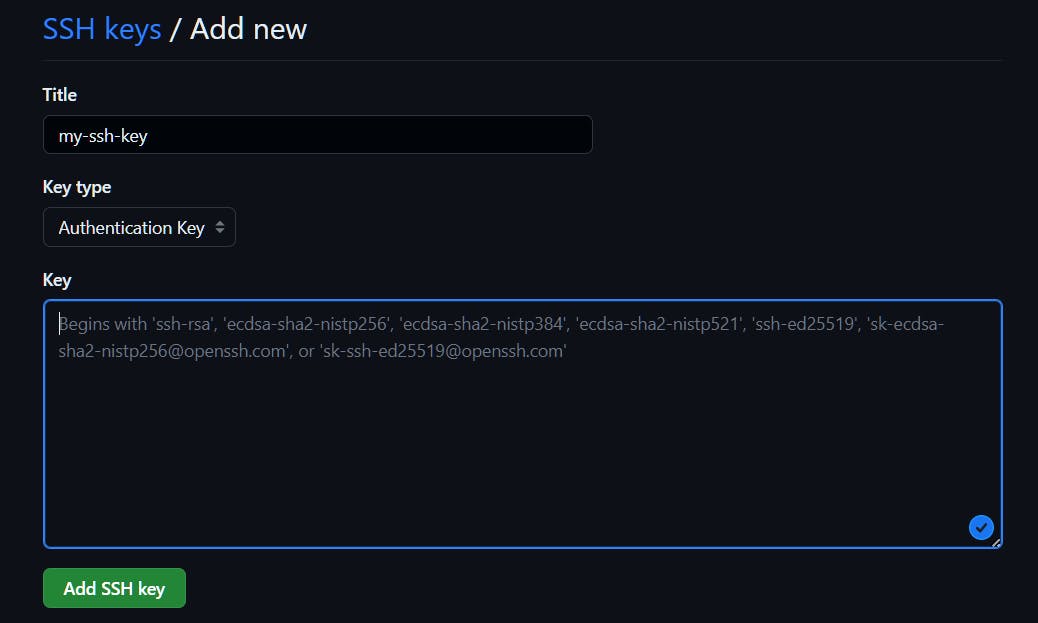
Give a name to the key and paste the key. But where is the key? Normally, a key can be found in your local system at ~/.ssh/id_rsa.pub If not found, you can generate a new key using ssh-keygen For now, choose default values for location of key and passphrase.
$ ssh-keygen
Generating public/private rsa key pair.
Enter file in which to save the key (/c/Users/omkar.shetkar/.ssh/id_rsa):
Enter passphrase (empty for no passphrase):
Enter same passphrase again:
Your identification has been saved in /c/Users/omkar.shetkar/.ssh/id_rsa
Your public key has been saved in /c/Users/omkar.shetkar/.ssh/id_rsa.pub
The key fingerprint is:
SHA256:hx8wvLkk2NwDHnxjZXeaIgP+aPaEzCpt6mHi5o7yMAg omkar.shetkar@LP1-AP-51803417
The key's randomart image is:
+---[RSA 3072]----+
|      .   o . .  |
|     o o o . +   |
|      = X . o    |
|     B X X .     |
|E   . % S o      |
|o  . + = = .     |
|= + +   o .      |
|+* =             |
|**+              |
+----[SHA256]-----+
Now you can copy the content of id_rsa.pub and paste in the above text box for Key. Press on Add SSH key to finish setting up of SSH key with GitHub.
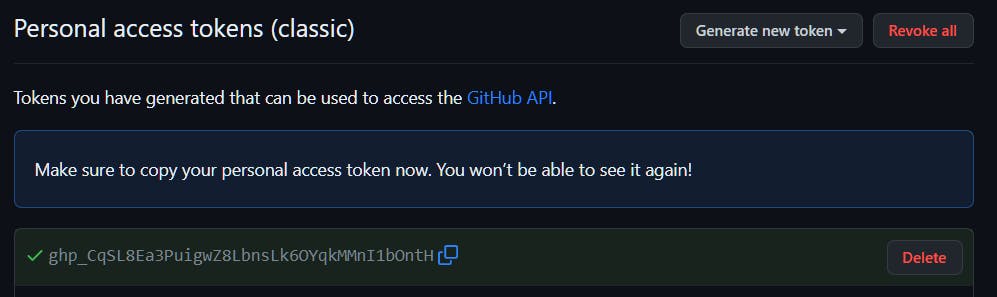
Personal Access Token
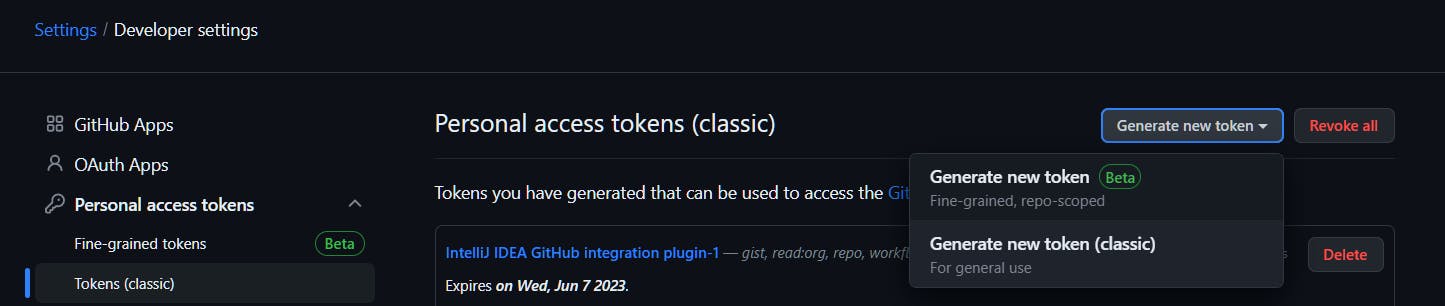
If we have added remote URL starting with https://, then need to create a PAT (Personal Access Token) in GitHub.

For this, Settings --> Developer settings --> Personal access tokens --> Tokens (classic) --> Generate new token (classic)
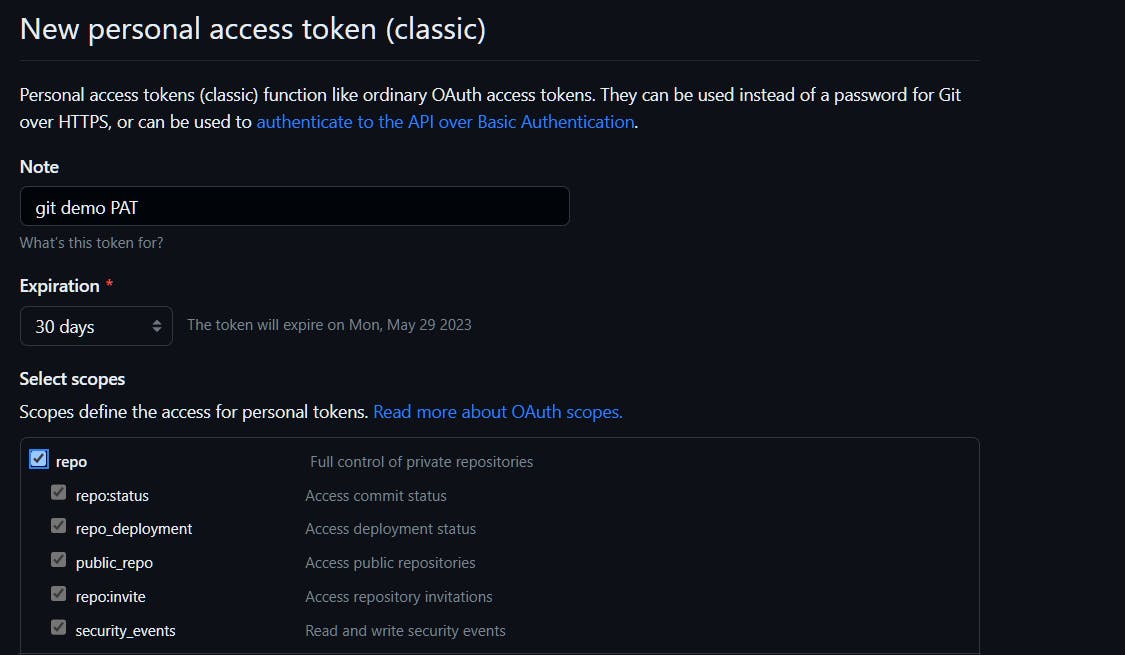
Give a name for token and select all scopes under repo and click on Generate token. We will be presented with the key; we need to copy and store it in a safe location. If It's lost, need to generate PAT again.
Now, coming back to where we left. We wanted to push our local changes to a remote GitHub server.
For this discussion, I have chosen SSH based verification. Let's try to push the changes:
$ git push -u origin main
Enter passphrase for key '/c/Users/omkar.shetkar/.ssh/id_rsa':
Enumerating objects: 3, done.
Counting objects: 100% (3/3), done.
Writing objects: 100% (3/3), 232 bytes | 232.00 KiB/s, done.
Total 3 (delta 0), reused 0 (delta 0), pack-reused 0
To github.com:Omkar-Shetkar/git-zero-to-hero-sample.git
 * [new branch]      main -> main
branch 'main' set up to track 'origin/main'.
Congratulations! 👏👏 We have pushed local changes to GitHub server. We can verify it in GitHub.
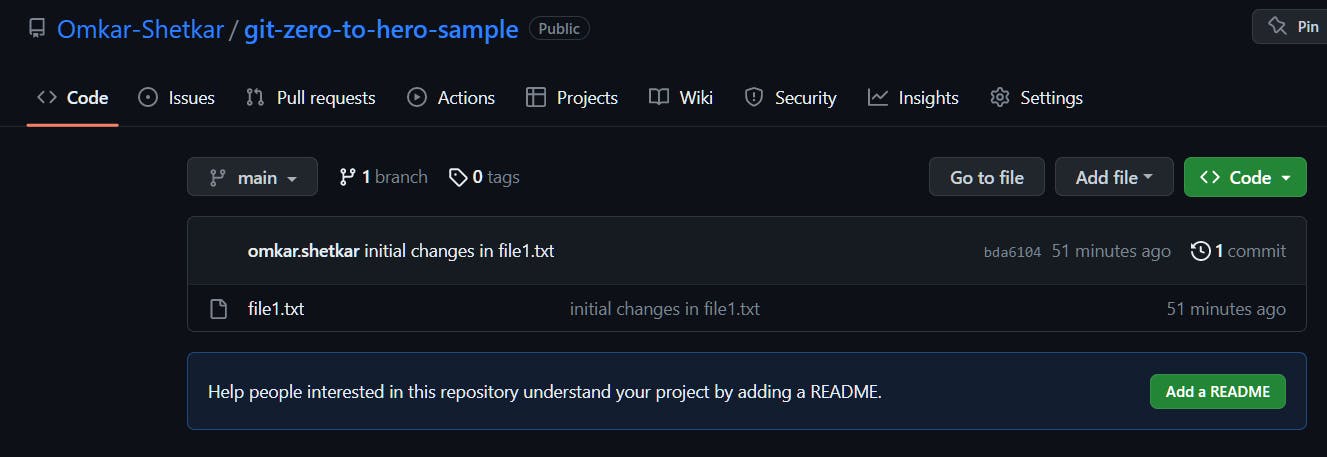
Now that we are done with one-time heavy lifting of setting up of remote origin URL, branch rename, and GitHub authentication setting, further interaction with Git will be relatively smooth and easy.
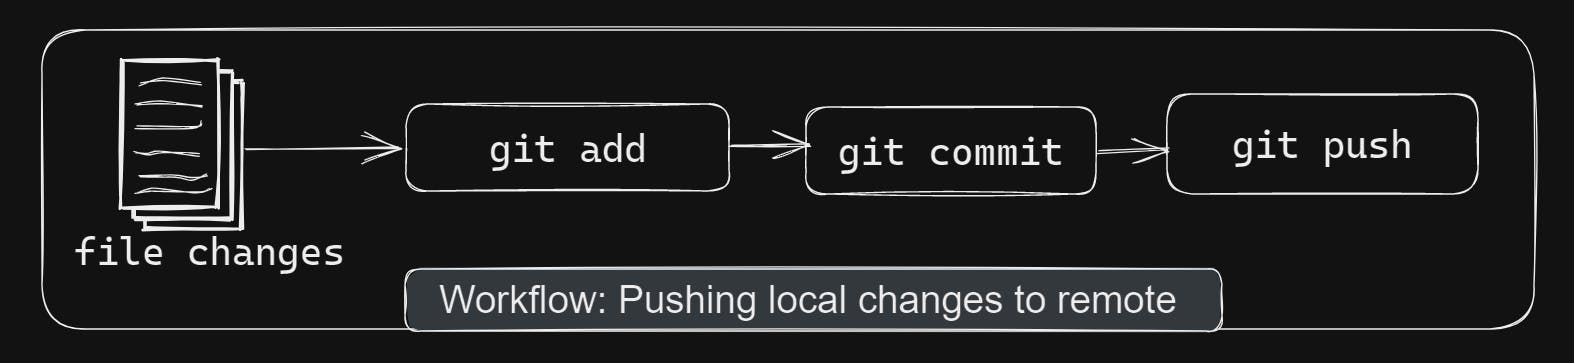
Let's make another change in file1.txt and push the changes to remote. As we have seen, git add, git commit, and git push will achieve this task. These three commands should have become our second nature after a while. 😊
$ echo "How are you?" >> file1.txt

$ cat file1.txt
Hello World!
How are you?

$ git add file1.txt

$ git commit -m "second line added in file1.txt"
[main 588f142] second line added in file1.txt
 1 file changed, 1 insertion(+)

$ git push
Enter passphrase for key '/c/Users/omkar.shetkar/.ssh/id_rsa':
Enumerating objects: 5, done.
Counting objects: 100% (5/5), done.
Writing objects: 100% (3/3), 277 bytes | 138.00 KiB/s, done.
Total 3 (delta 0), reused 0 (delta 0), pack-reused 0
To github.com:Omkar-Shetkar/git-zero-to-hero-sample.git
   bda6104..588f142  main -> main
So far, we have created a repository from scratch and pushed the changes to a remote server. In most cases, we need to make our changes on top of the already existing repository. For this, we need to clone the repository.
Cloning a repository
Delete the local folder git-zero-to-hero-sample. We will get this through git clone. By cloning a repository, we download the remote repository into our local system along with Git metadata. That means, we need not worry about setting origin, branch rename etc. To clone a repository, we use git clone
$ git clone git@github.com:Omkar-Shetkar/git-zero-to-hero-sample.git
Cloning into 'git-zero-to-hero-sample'...
Enter passphrase for key '/c/Users/omkar.shetkar/.ssh/id_rsa':
remote: Enumerating objects: 6, done.
remote: Counting objects: 100% (6/6), done.
remote: Compressing objects: 100% (2/2), done.
remote: Total 6 (delta 0), reused 6 (delta 0), pack-reused 0
Receiving objects: 100% (6/6), done.
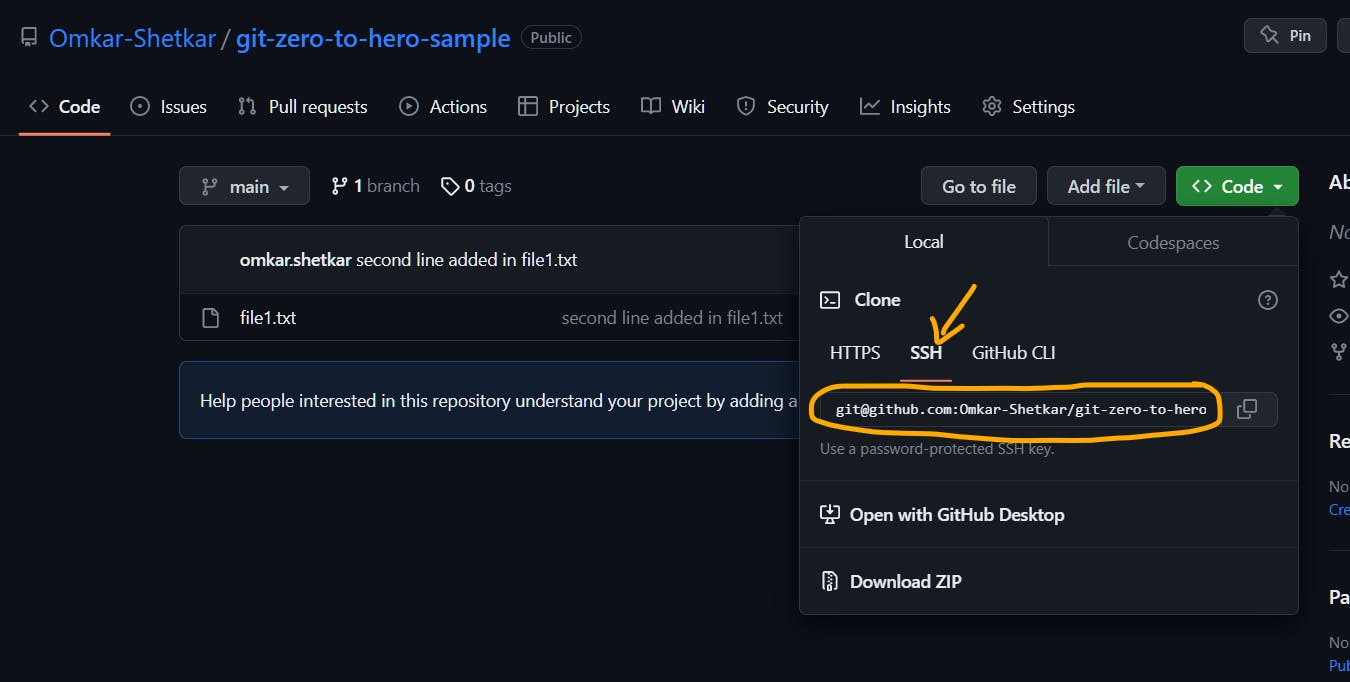
We can either use SSH or HTTPS URL as argument to git clone. Here, for discussion, we are using SSH URL. For HTTPS URL, we need to provide PAT when asked.
Git is all about collaboration between developers. That means, multiple developers can work on the same repository. Then, how do they coordinate their work? How does Git ensure that each developer works on the latest changes? What if conflict of code changes arises and will that block the work of developers? Answers to these questions lie in Git branches.
Git branches
Git branch is a moving pointer which points to a particular commit.
In this section
We will check current position of
mainin Git historyCreate a commit and verify the position of
mainCreate a branch
Create a commit in new branch
Changing current branch and create a commit
Current branch position
Currently we are on branch main. Create a few more commits. Remember, creating a commit means making some changes in files, stage the changes, and committing them. Every commit has an associated id, which we will refer to as Commit ID.
$ git log
commit 8b9557298c498facccc2c96eb1a976ba1f7f3905 (HEAD -> main, origin/main, origin/HEAD)
Author: omkar.shetkar <omkar.shetkar@hcl.com>
Date:   Sat Apr 29 11:37:13 2023 +0530

    4th line added

commit 6976f7f0ff427374ac5f9168154e302241ba846f
Author: omkar.shetkar <omkar.shetkar@hcl.com>
Date:   Sat Apr 29 11:35:45 2023 +0530

    third line added

commit 588f1425c5131263266220370409e6ead7c72135
Author: omkar.shetkar <omkar.shetkar@hcl.com>
Date:   Sat Apr 29 10:05:42 2023 +0530

    second line added in file1.txt

commit bda6104426f618e481b1ae5f6e0ed01a3073fa93
Author: omkar.shetkar <omkar.shetkar@hcl.com>
Date:   Sat Apr 29 05:28:17 2023 +0530

    initial changes in file1.txt
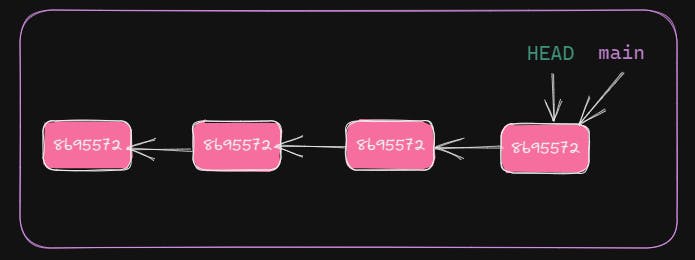
git log will give commit information from current commit till first commit, in chronologically descending order. We have two pointers HEAD and main, pointing to the latest commit. main is the current branch name.
Current branch position after new commit
Let's add another commit.
$ echo "It's summer now!" >> file1.txt

$ git add file1.txt

$ git commit -m "fifth line added"
[main 9db8cc0] fifth line added
 1 file changed, 1 insertion(+)
With git log we can see that the latest commit has changed.
I have trimmed the output for brevity.
$ git log
commit 9db8cc043ef75c238bc996bdb23a678406c258e7 (HEAD -> main)
Author: omkar.shetkar <omkar.shetkar@hcl.com>
Date:   Sat Apr 29 19:30:03 2023 +0530

    fifth line added

commit 8b9557298c498facccc2c96eb1a976ba1f7f3905 (origin/main, origin/HEAD)
Author: omkar.shetkar <omkar.shetkar@hcl.com>
Date:   Sat Apr 29 11:37:13 2023 +0530

    4th line added

...

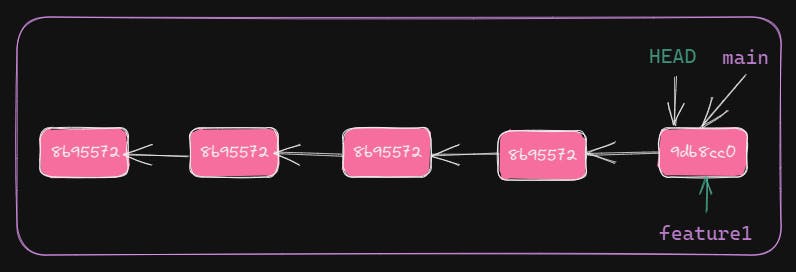
HEAD and main moved to point to the latest commit.
Git Branch is a moving pointer which points to a particular commit. Whenever a new commit is created, it moves to point to it.
HEADpoints to the latest commit in the current branch. The current branch can bemainor can be any other branch.
Now that we understand the basic nature of branch, let's understand the concept of using multiple branches in Git.
Creating a feature branch
Let's create another branch feature1. git branch will create a new branch. But branch from where? 🤔From the current branch. In our case, the current branch is main. We create feature1 off of main. feature1 will be referred as feature branch and main as base branch.
$ git branch feature1

$ git log
commit 9db8cc043ef75c238bc996bdb23a678406c258e7 (HEAD -> main, feature1)
Author: omkar.shetkar <omkar.shetkar@hcl.com>
Date:   Sat Apr 29 19:30:03 2023 +0530

    fifth line added

commit 8b9557298c498facccc2c96eb1a976ba1f7f3905 (origin/main, origin/HEAD)
Author: omkar.shetkar <omkar.shetkar@hcl.com>
Date:   Sat Apr 29 11:37:13 2023 +0530

    4th line added
...

HEAD, main, and feature1 are pointing to same commit. The current branch is still main, as HEAD pointing to the latest commit of main. See output of git log which shows HEAD -> main.
Let's make feature1 as the current branch.
Use git switch to change the current branch.
$ git switch feature1
Switched to branch 'feature1'
$ git log
commit 9db8cc043ef75c238bc996bdb23a678406c258e7 (HEAD -> feature1, main)
Author: omkar.shetkar <omkar.shetkar@hcl.com>
Date:   Sat Apr 29 19:30:03 2023 +0530

    fifth line added
Now, HEAD is pointing to the latest commit of feature1.
New commit in feature branch
Let's make a commit in the feature branch.
$ echo "Temperature is around 35C here!" >> file1.txt
$ git add file1.txt
$ git commit -m "temperature added"
[feature1 0ef49e2] temperature added
1 file changed, 1 insertion(+)
$ git log
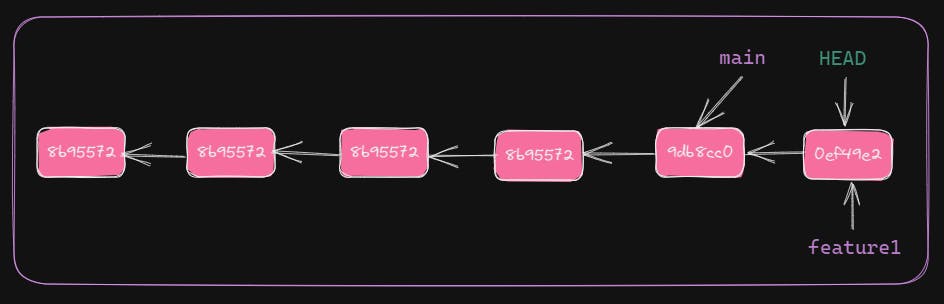
commit 0ef49e27187d5a7b9769d8b6cd78d0e201eb1bbf (HEAD -> feature1)
Author: omkar.shetkar <omkar.shetkar@hcl.com>
Date: Sat Apr 29 19:52:16 2023 +0530
temperature added
commit 9db8cc043ef75c238bc996bdb23a678406c258e7 (main)
Author: omkar.shetkar <omkar.shetkar@hcl.com>
Date: Sat Apr 29 19:30:03 2023 +0530
fifth line added
...
Both HEAD and feature1 point to the latest commit. But main hasn't changed its position. Because the latest commit was created in branch feature1 and not in main. HEAD always points to the latest commit of current branch.
Next one is fun. 😊
Switch branch
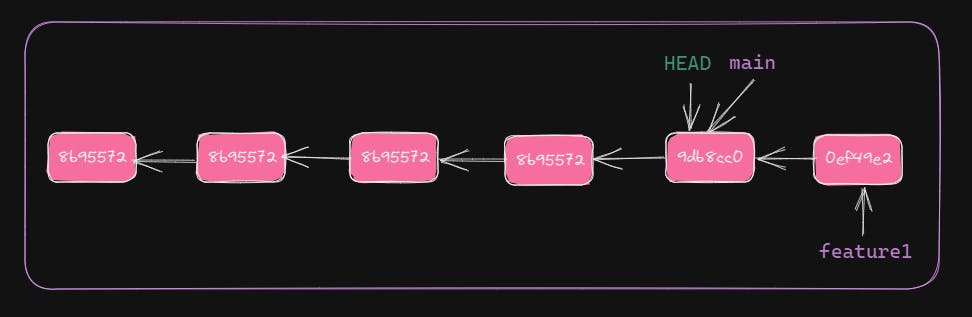
Let's switch back to main and see the content of the working directory and HEAD position.
$ git switch main
Switched to branch 'main'
Your branch is ahead of 'origin/main' by 1 commit.
  (use "git push" to publish your local commits)

$ cat file1.txt
Is it going to rain tomorrow?
It's summer now!

$ git log
commit 9db8cc043ef75c238bc996bdb23a678406c258e7 (HEAD -> main)
Author: omkar.shetkar <omkar.shetkar@hcl.com>
Date:   Sat Apr 29 19:30:03 2023 +0530

    fifth line added

commit 8b9557298c498facccc2c96eb1a976ba1f7f3905 (origin/main, origin/HEAD)
Author: omkar.shetkar <omkar.shetkar@hcl.com>
Date:   Sat Apr 29 11:37:13 2023 +0530

    4th line added
Now, HEAD is again pointing to the latest commit of main. Also, note that file1.txt doesn't contain changes done in feature1. After switching branches, Git changes the working directory content.
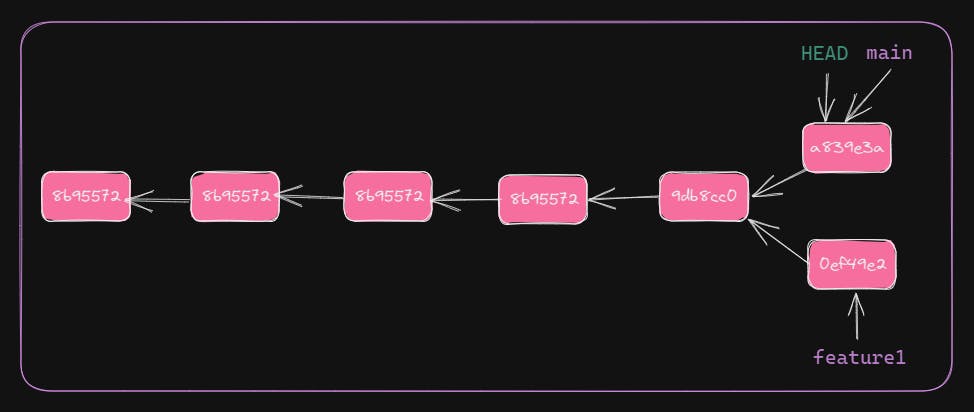
Let's create another commit.
$ git log
commit a839e3a5a70e6f0e91009a8d4d7ff836c7056dfa (HEAD -> main)
Author: omkar.shetkar <omkar.shetkar@hcl.com>
Date:   Sat Apr 29 20:07:54 2023 +0530

    summer juices

commit 9db8cc043ef75c238bc996bdb23a678406c258e7
Author: omkar.shetkar <omkar.shetkar@hcl.com>
Date:   Sat Apr 29 19:30:03 2023 +0530

    fifth line added
HEAD and main point to the latest commit. Also, changes in main and feature1 are diverged. This is part of collaborated development workflow.
PRO TIP🚀
To create a new branch and switch to it with single command:
git switch -c new-branch base-branchHere, -cflag stands for create. Eg.,git switch -c feature1 mainwill createfeature1off ofmain.
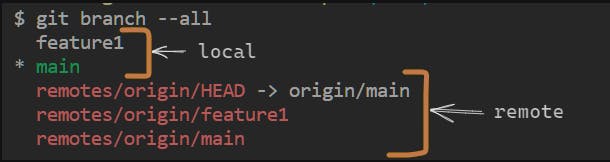
Git repository (.git directory) holds two kinds of branches. Local branches and remote branches. Normally, the local branch will have its corresponding remote branch. Changes are made in local branches and pushed to remote. Remote branches are read-only, helpful in seeing the latest changes.
Creating a Git branch is a light-weight process. It's just about creating a pointer to a commit.
To delete a local branch use git branch -d branch-name
The Git branch is a very powerful feature of Git which sets it apart from other version control tools. Now, let us see how multiple developers can collaborate their work on Git using branches.
Collaboration on Git
Create a pull request (PR)
Normally, it's recommended to create a new branch to work on a feature. This feature branch will be created from base branch like main.
Here, feature branch feature1 created off of main. Hence, base branch will be main and feature branch will be feature1. The developer will make code changes in feature1, without worrying about what changes coming into main. Once done with all changes in feature1, the developer would like to merge changes into main.
We need to push our changes on feature1 to remote. It's the same process as discussed before. For the first time, we will need to set remote upstream branch otherwise Git will reject the push.
$ git swith feature1

$ git push
fatal: The current branch feature1 has no upstream branch.
To push the current branch and set the remote as upstream, use

    git push --set-upstream origin feature1

To have this happen automatically for branches without a tracking
upstream, see 'push.autoSetupRemote' in 'git help config'.

$ git push -u origin feature1
Enter passphrase for key '/c/Users/omkar.shetkar/.ssh/id_rsa':
Enumerating objects: 6, done.
Counting objects: 100% (6/6), done.
Delta compression using up to 12 threads
Compressing objects: 100% (2/2), done.
Writing objects: 100% (6/6), 477 bytes | 477.00 KiB/s, done.
Total 6 (delta 0), reused 6 (delta 0), pack-reused 0
remote:
remote: Create a pull request for 'feature1' on GitHub by visiting:
remote:      https://github.com/Omkar-Shetkar/git-zero-to-hero-sample/pull/new/feature1
remote:
To github.com:Omkar-Shetkar/git-zero-to-hero-sample.git
 * [new branch]      feature1 -> feature1
branch 'feature1' set up to track 'origin/feature1'.
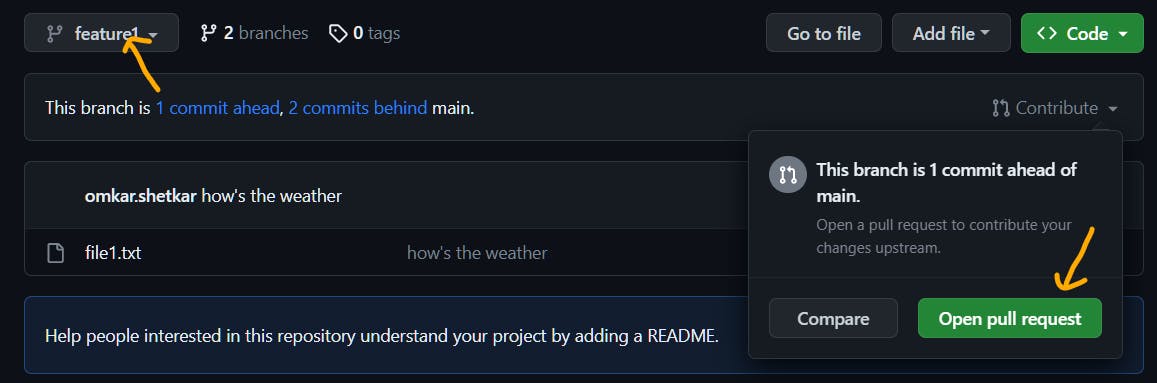
Now, we will raise a Pull Request (PR) on GitHub. With PR we can ask fellow developers to review code. Once everything is fine, we can merge the changes into base branch main.
To create a PR, select your feature branch and click on Open pull request.
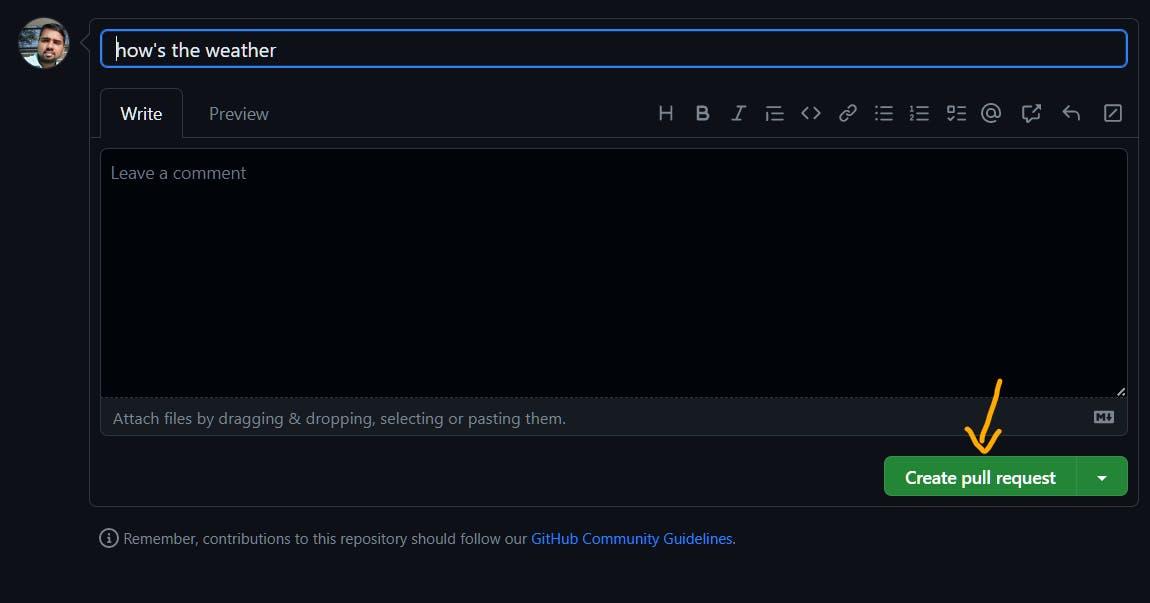
Then, create the pull request.
In some cases, changes in feature branch can conflict with the changes in base branch. Then, GitHub shows conflicting files. Need to resolve them manually.
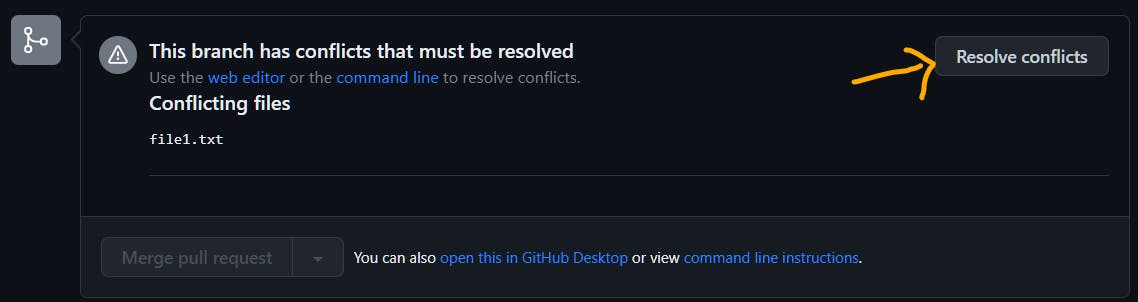
Conflicting changes show which changes from feature branch conflicting with base branch.
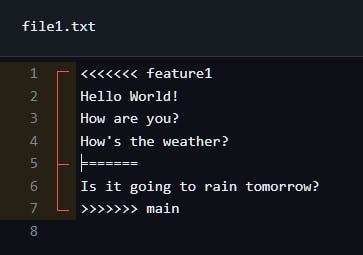
After resolving the changes, click on Mark as resolved and Commit merge.

PR reviewers can be added here

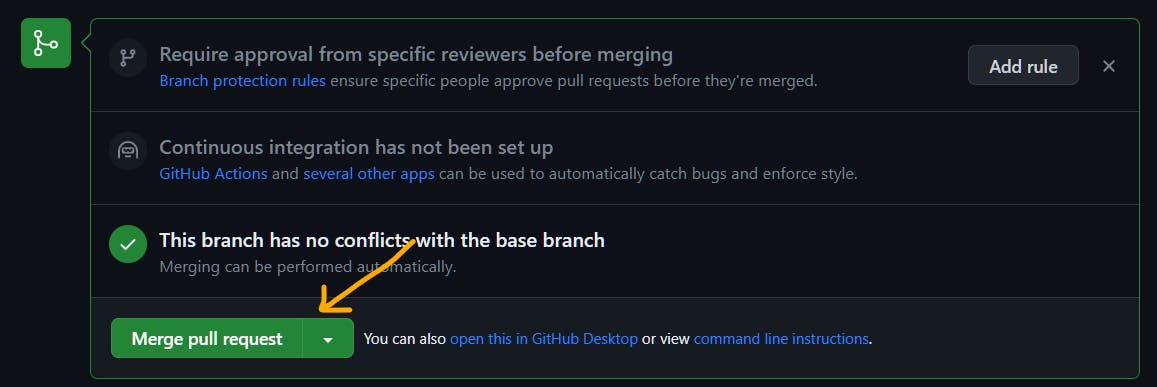
As it's a sample application, we don't have any reviewers for it. For enterprise applications, we will be having code reviewers. Once code review is done, you can choose to merge the changes into base branch by clicking on Merge pull request. Now, changes in feature branch are part of base branch.
Once merge is done, don't forget to delete the feature branch as it is no longer required.

Keeping local repository up-to-date
Before starting a new feature development, you want to have the latest codebase. For this, you can use either git fetch or git pull.
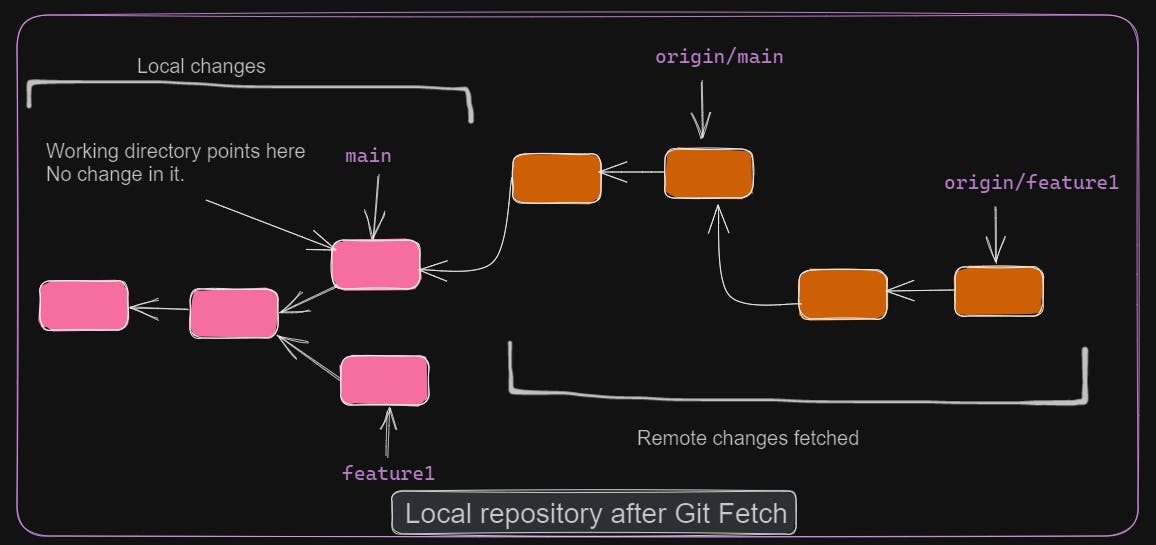
Git Fetch
git fetch downloads content from remote but does not interfere with local changes in the working directory. With this, we can see the latest changes in remote branches.
$ git fetch
Enter passphrase for key '/c/Users/omkar.shetkar/.ssh/id_rsa':
remote: Enumerating objects: 14, done.
remote: Counting objects: 100% (14/14), done.
remote: Compressing objects: 100% (5/5), done.
remote: Total 10 (delta 0), reused 6 (delta 0), pack-reused 0
Unpacking objects: 100% (10/10), 1.77 KiB | 47.00 KiB/s, done.
From github.com:Omkar-Shetkar/git-zero-to-hero-sample
   bf5eee6..eff3973  feature1   -> origin/feature1
   588f142..e768675  main       -> origin/main
To understand git pull, we need to know about git merge and git rebase.
Git Merge
git merge merges the changes from given branch into current branch.
$ git switch -c feature2 main
Switched to a new branch 'feature2'

$ git merge feature1
Updating 588f142..bf5eee6
Fast-forward
 file1.txt | 1 +
 1 file changed, 1 insertion(+)
Here, we are merging changes from feature1 into current branch feature2.
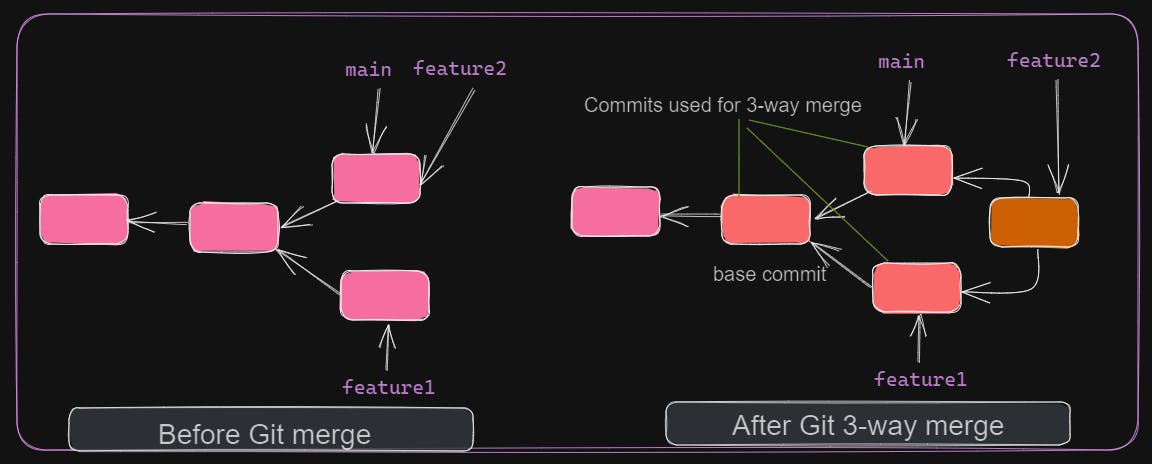
git merge automatically decides whether to perform fast-forward merge or 3-way merge. In a fast-forward merge, it simply moves the current branch pointer to the latest commit of the target branch. In a 3-way merge, Git needs to create a new merge commit by considering 3 commits. 3 commits include the latest commits of current and target branch and common base commit. In the above example, Git performs fast-forward merge since there were no changes in feature2 in parallel to feature1.
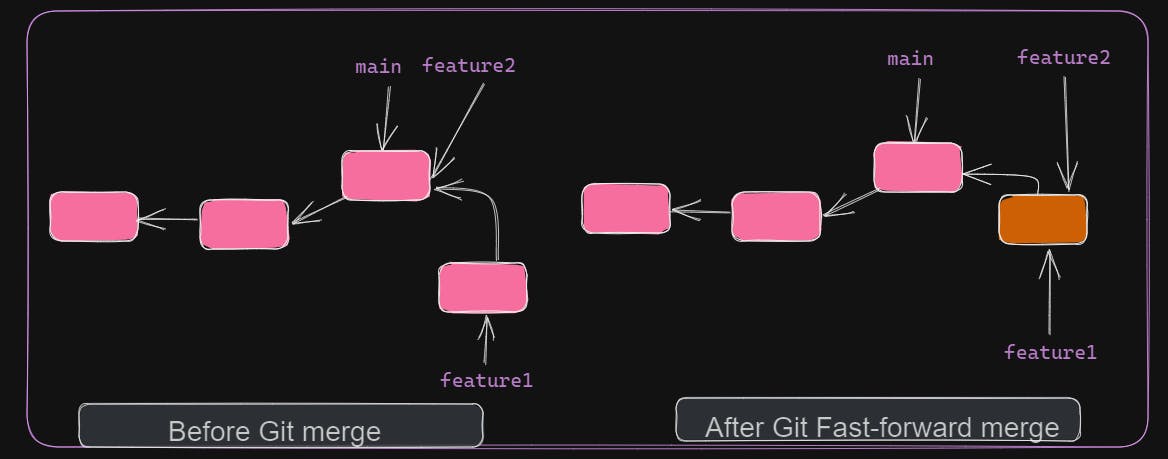
A fast-forward merge never results in conflict as it's just a movement of branch pointer. A 3-way merge can result in conflict as the same file can have different changes at the same place. Conflicts should be resolved manually.
If a conflict occurs,
git statusis your friend describing the next steps to be performed.
Git Rebase
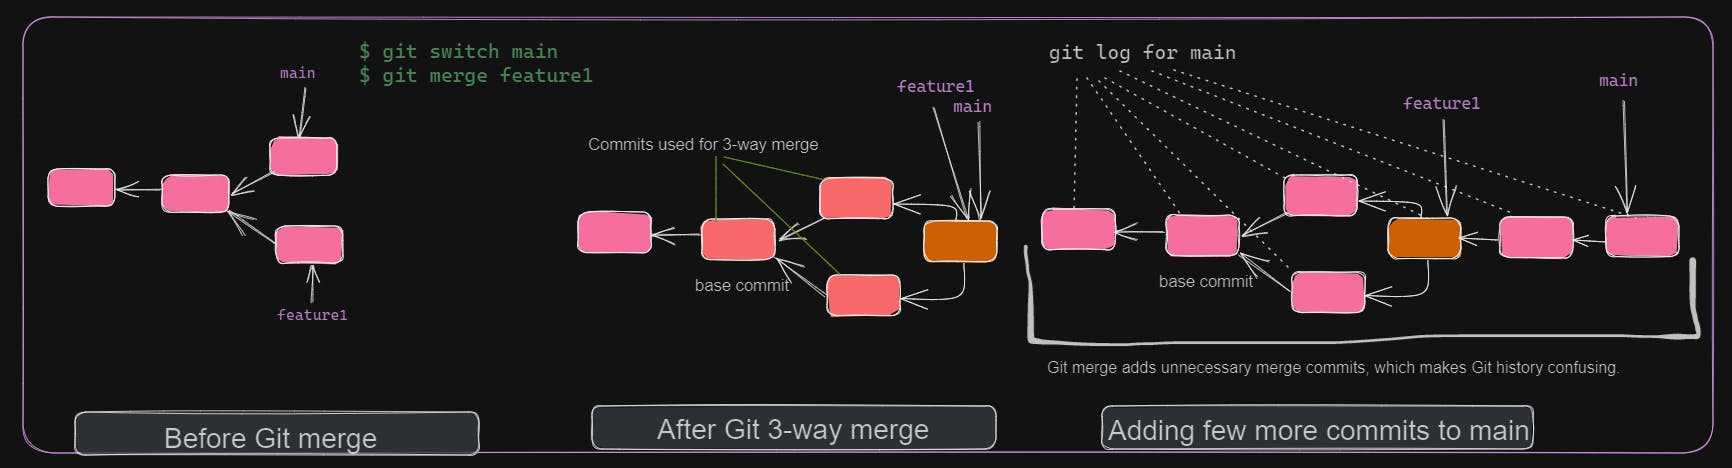
git merge creates merge commits if it's a 3-way merge. This will introduce unnecessary merge commits in git history. Remember, git history can be checked with git log.
git rebase is similar to git merge. But instead of directly performing a 3-way merge, it first considers the target branch commits. Then, merges the current branch commit on top of it. This will ensure that the target branch commit history is intact. This is useful when debugging applications, where you can easily find the commit causing the issue.
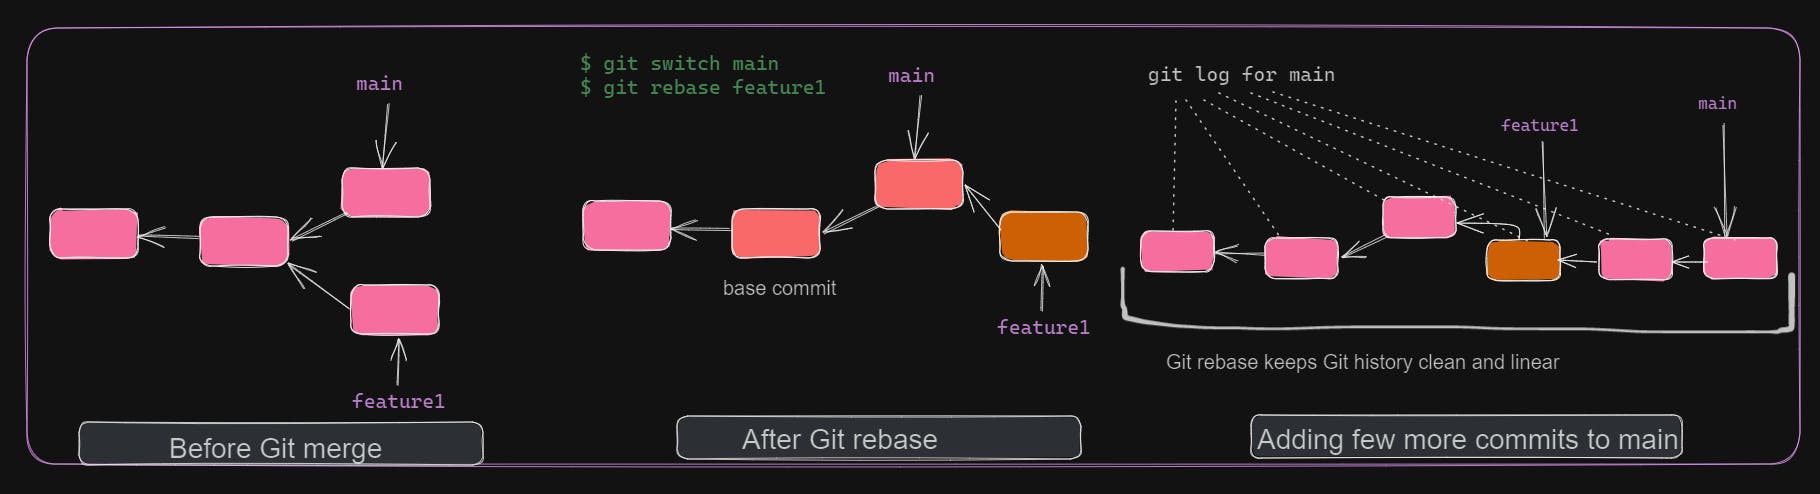
Prefer git rebase when you want to get latest changes from base branch into your feature branch.
It's a good practice to rebase your feature branch frequently to avoid/minimize conflicts during PR merge.
But don't rebase on branches which are publicly exposed, like main.
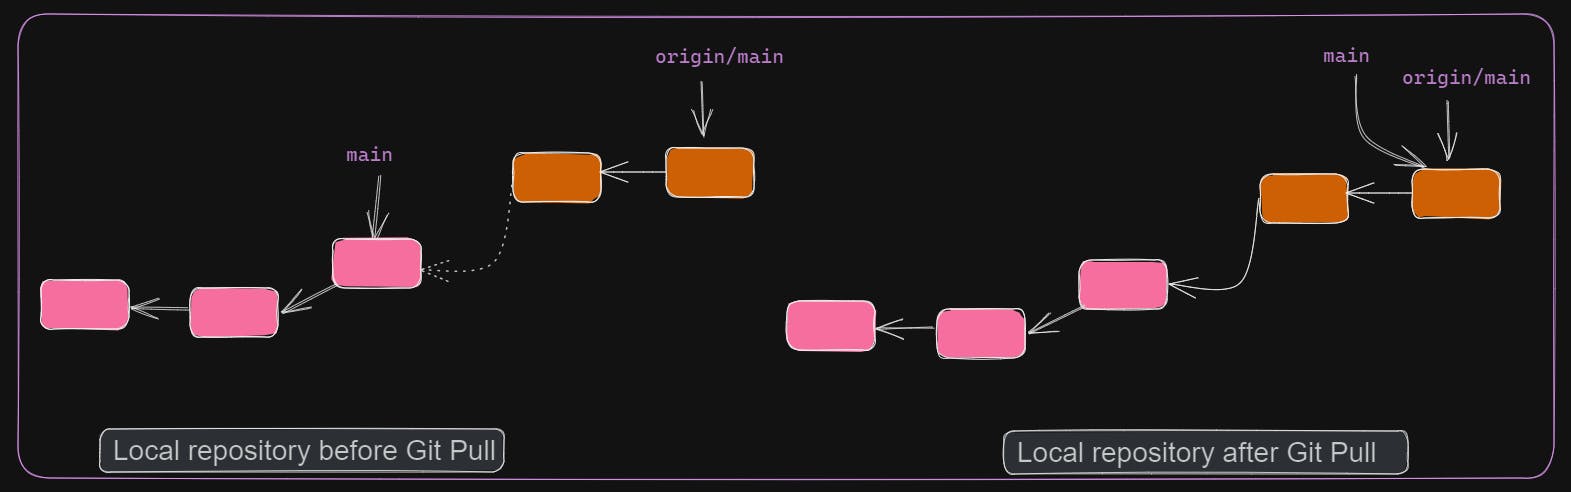
Git Pull
git pull downloads content from remote for the current branch and tries to merge the latest changes with the changes in the working directory. git pull can be considered as a combination of git fetch and git merge with little caveat. git fetch downloads all of branch commits but with git pull commits of current branch only are downloaded. By default, git pull performs git merge. We can force it to perform rebase with --rebase option.
$ git pull
Enter passphrase for key '/c/Users/omkar.shetkar/.ssh/id_rsa':
Updating 588f142..e768675
Fast-forward
 file1.txt | 2 ++
 1 file changed, 2 insertions(+)
Finally, complete Git workflow of a feature development will be as follows. Clone the repository if not already done. If feature development takes time, then remember to rebase with base branch regularly. This will ensure that no or minimum conflicts occur in PR. After you are done with changes, stage and commit them. Push to remote. Raise a PR for peer code review. After all fine, merge the PR into base branch and delete the feature branch.

Summary
Till now we have covered essential Git concepts which are required to get started. We started by creating an empty repository. Then I added a new file. Staged and committed the changes. We set up GitHub repository and added a remote URL in the local repository. Now, we are able to push our changes to remote server.
Then, we switched the gear and looked at cloning an already existing repository. Most importantly we created a new branch and made a few more commits. Pushed our changes to remote. Now, we wanted to merge our changes to base branch. For this, we created PR.
We learnt about how to keep our local repository up-to-date. Learned the difference between git fetch and git pull. Learned the advantages of rebase over merge.
Git is a powerful SCM. It has a lot more useful tools in its kit, like stashing the changes, forking a repository, cherry picking a commit, bare git, git notes etc. You can even dig deeper to know what lies inside a commit; how does Git optimize the storage of changes? etc. Now, as we are comfortable with the basics of Git, I will let you explore further advanced features.
Best sources to learn further are https://git-scm.com/docs and https://www.atlassian.com/git/tutorials.
Let me know if you face any difficulty in following the tutorial or have any suggestions.